For more information: lakehelp2@gmail.com
Layout of a Tri-fold Brochure
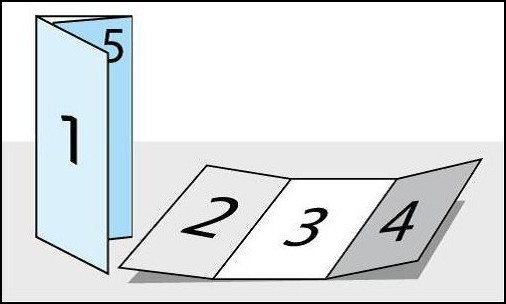
Promotional brochures come in many sizes and can be folded many different ways, the most common being the tri-fold brochure. This fold creates three equal sections by folding the sides over the middle. Most tri-folds bend the right side first and then the left so that when opened, the brochure reads from left to right. Knowing how to lay out a tri-fold brochure can be confusing without a guide. Below is an explanation of the pages and what information is usually included in each section.
The Trifold Layout
Even though tri-fold brochures can be any size, the fold is usually based on the landscape view of the paper. The numbers assigned to each section indicate the order of appearance when the brochure is unfolded and read by a client. When designing the front, sections 2, 3, and 4 are showing, respectively. The back of the flat paper reveals sections 5, 6, and 1, respectively.
The Brochure Design
Section 1: This first section is the front flap of the folded brochure. Usually this outside front cover includes an image, the name of the company, and a strong message that entices the reader to open the brochure and continue reading for more information.
Section 2: The reader unfolds the brochure to see the inside front cover. Many consider this section to be the most important because it should elicit an “I need this and can’t live without it!” response. Often this flap contains both questions and answers that tell the reader why this product, service, or event is necessary.
Sections 3 & 4: Next the reader opens the brochure to see the entire interior of the brochure. The middle and right interior panels usually contain further information. This section can become too muddled with lots of text, which is why many designers choose to use many headers and subheaders for organization.
Section 5: Often, this outside flap includes a tear-away order form, a ticket to an event, or sometimes extra information such as testimonials. Or this panel could include blank lines for note-taking, a mini-calendar, or a discount coupon.
Section 6: The outside back panel is usually reserved for contact info, the logo, or possibly a map. If used as a direct mail piece, this back section reserves a place for the mailing address and stamp. Or if section 5 contains a form that the client will fill out and mail, this back side of the outside flap should contain the company address and a postage stamp box.
More Information: lakehelp2@gmail.com

